
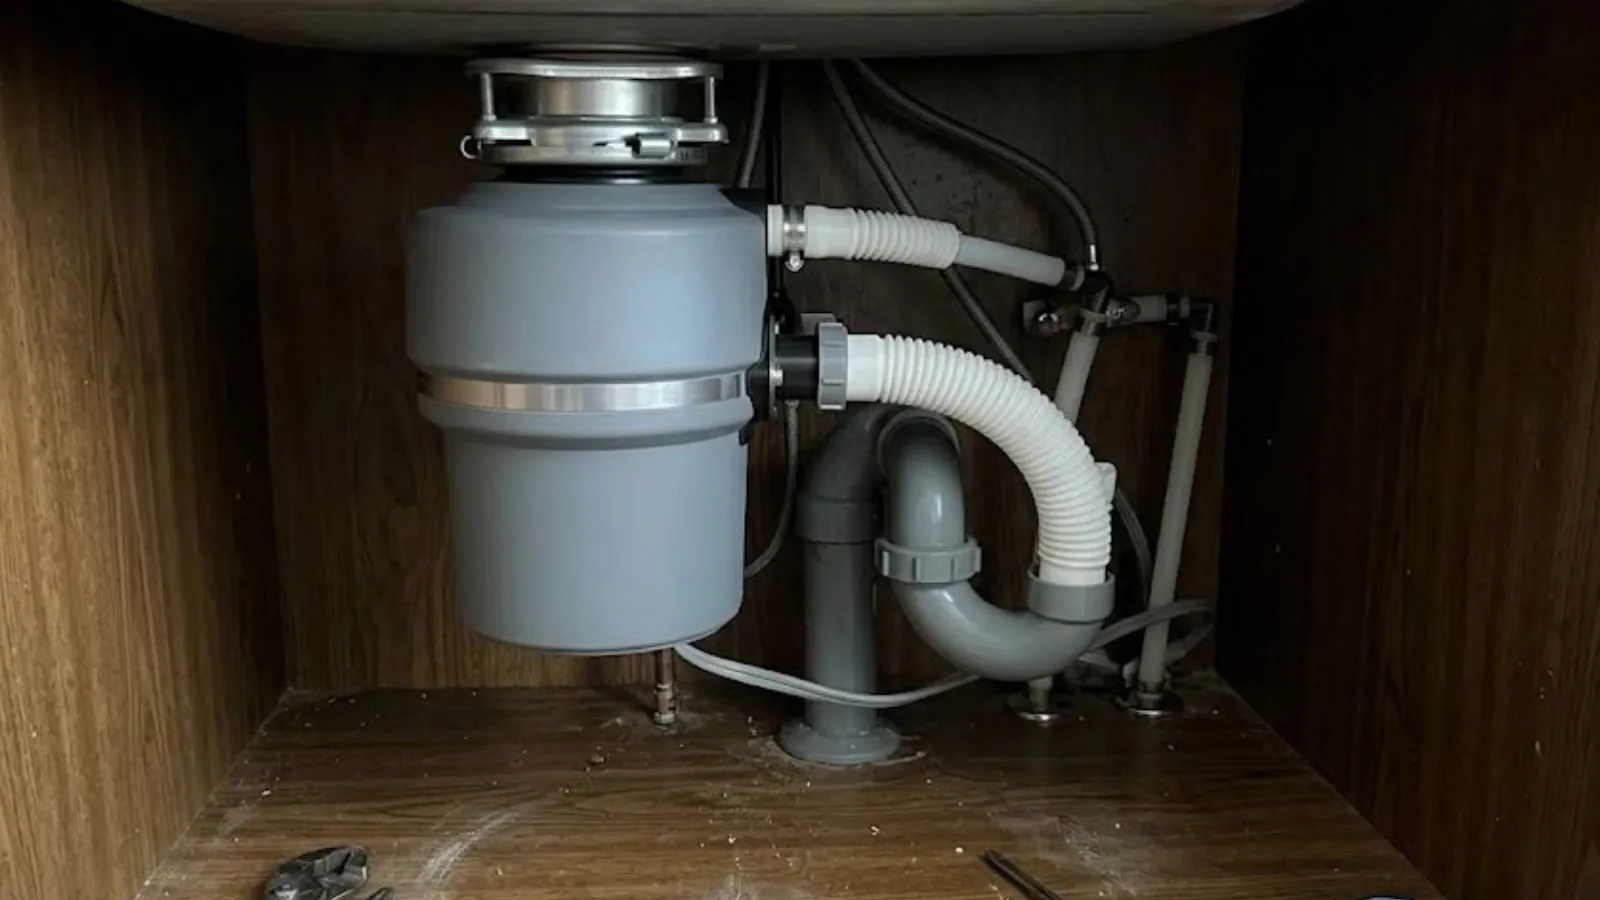
Decide how big the job really is
Swapping a sink for the same size in the same cutout is a very different job from changing the layout. A like-for-like swap reuses the existing supply stops and the existing drain stub in the wall. A new layout means moving pipe, and that is where cost, code and risk go up quickly.
Before buying anything, measure the cutout and look under the sink. Note where the drain leaves the wall, whether the shutoff valves turn, and whether there is already an outlet for a disposal. A disposal needs a switched or plug-in power supply, and that part is electrical work.
Tools and parts to gather before you shut anything off
Lay everything out first. A trip to the hardware store with the water off turns a one-day job into three.
- Basin wrench, adjustable pliers, screwdrivers and a putty knife
- Plumber's putty or the sealing gasket that comes with the sink strainer
- Silicone caulk rated for kitchens, plus a caulk gun
- New braided supply lines and a pair of working shutoff valves
- Trap kit, tailpiece and a dishwasher drain connector
- Disposal mounting kit, and a power cord if the unit does not include one
- Bucket, towels and a flashlight
Removing the old sink and cleaning the opening
Turn off both shutoff valves under the sink, then open the faucet to relieve pressure. Disconnect the supply lines, the trap and the dishwasher hose. Expect water in the trap, so keep the bucket under it.
Cut the caulk bead around the sink rim with a utility knife. Drop-in sinks are held by clips underneath, and undermount sinks hang from brackets or adhesive, so support the sink before you release the last fastener. Scrape off old caulk and putty so the new seal has a clean surface.
Want a plumber on the hard parts?
Call (973) 488-5410 and describe the sink, the disposal and the drain layout. We give a clear price before work starts.
Call (973) 488-5410Setting the new sink and faucet
Mount the faucet to the sink before the sink goes into the counter. It is much easier to tighten the nuts with the sink upside down on a towel than from inside a cabinet.
Run a continuous bead of silicone around the cutout, lower the sink in, and tighten the clips evenly so the rim seats without bowing. Wipe off squeeze-out right away. Then install the strainer basket in the main drain opening with putty or the supplied gasket, tightening the locknut from below until it is firm and snug.
Disposal basics: which unit fits your kitchen
Disposals differ in more than horsepower. This table sorts out the choices that matter for a typical household.
| Choice | What it means | Watch out for |
|---|---|---|
| Continuous feed or batch feed | Continuous runs while the switch is on. Batch runs only when the stopper is in place | Batch units are safer around children but need the stopper to be used every time |
| Motor size | Larger motors grind faster and jam less often | A bigger unit is heavier and needs more room under the sink |
| Mounting system | Quick-lock mounts make install and later replacement easier | Old sink flanges may not match, so check compatibility |
| Power connection | Hardwired or cord and plug into a dedicated outlet | Any new circuit or outlet is electrical work with its own permit rules |
Match the unit to the sink bowl depth and the space below it before you buy.
Mounting the disposal and connecting the drain
Slip the mounting ring, fiber gasket and backup ring onto the strainer flange from below, then snap the retaining ring into its groove. Tighten the three mounting screws evenly until the assembly is firm. Hang the disposal on the ring and turn it to lock.
If a dishwasher is connected, knock out the plug inside the disposal's dishwasher inlet with a screwdriver and hammer before connecting the hose. Forgetting that plug is a classic mistake, and the dishwasher will then fill the sink or leak at the connection. Attach the discharge elbow with its gasket and run the trap from there.
Getting the trap and slope right
A trap holds a small plug of water that blocks sewer gas. Plumbing codes require every fixture to have one, and the trap arm needs a gentle downward slope toward the wall, generally about a quarter inch per foot as a rule of thumb. Too flat holds water, and too steep can let water run ahead of solids.
Dry fit every piece before tightening. Two bowls with one disposal need a continuous waste fitting so both sinks drain through a single trap. Keep joints hand-tight, then add a quarter turn.
Testing before you close the cabinet
A leak found now is a nuisance. Found a week later, it is a rotted cabinet floor.
- Turn the supply valves on slowly and check both connections with a dry paper towel
- Fill both bowls, pull the stoppers and watch every joint of the trap while it drains
- Run the disposal with cold water flowing, and listen for scraping or a hum with no spin
- Run the dishwasher drain cycle if one is connected
- Check again in an hour and again the next morning with paper towel under each joint
If a joint weeps, drain it, dry it, reseat the gasket and retighten.
Kearny permits, the lateral rule and your kitchen drain
Kearny's Construction Code Enforcement office is in the Town Hall Annex at 410 Kearny Ave, and its front office is reachable at (201) 955-7880 on weekdays. Under the NJ Uniform Construction Code, plumbing work on existing buildings needs a construction permit, and the only listed exemption is ordinary maintenance, which includes routine repair.
Whether a sink and disposal swap counts as ordinary maintenance depends on the scope, so permit rules vary and you should ask the construction code office before you start. All permits require an inspection, and plumbing on one- and two-family dwellings is inspected at the rough piping and final fixture stages.
One more Kearny point matters for kitchen drains. If a new sink backs up into the house, call Kearny DPW at (201) 998-3700. If the town's main is flowing, the blockage is in the lateral, and the property owner is responsible for maintaining and repairing it.
Source: Kearny Construction Code Enforcement and Kearny DPW pages, and NJ Department of Community Affairs Uniform Construction Code guidance.
When to hire a plumber instead
Doing a straight swap yourself is realistic. These situations are better handed to a licensed plumber. Moving the sink to a different wall, replacing corroded shutoff valves that will not close, finding galvanized supply pipe that crumbles when touched, or connecting a drain stub that sits at the wrong height all go beyond a simple swap.
In many older homes the drain behind the wall is cast iron or galvanized steel, and forcing a new trap onto a rough, corroded stub tends to leak. If you are installing a new unit and the kitchen drain was already slow, our drain cleaning team can clear the line first so you do not blame the new disposal for an old clog.
Care for the new disposal
Run plenty of cold water before, during and for about fifteen seconds after grinding. Cold water keeps fats solid so they flush through instead of coating the pipe. Keep fibrous waste, bones and grease out of it.
If the unit hums but will not spin, the flywheel is jammed. Turn the power off, then use the hex socket at the bottom to work it free. For deeper problems see our garbage disposal repair page. If you would rather have the whole job done to code, plumbing installation covers sinks, disposals and supply and drain changes.
Frequently asked questions
Often yes, if the sink already has a standard drain opening, the power outlet is in place and the drain stub lines up. It is a one-day job for a patient homeowner. Call a plumber if the drain is corroded, the layout changes or the electrical connection needs new wiring.
A like-for-like swap usually takes a few hours for a plumber and a full day for a first-time DIYer, including caulk curing time before heavy use. Moving the sink or repairing old pipe behind the wall adds time.
Permit rules vary, so ask the Kearny construction code office before you start. State code requires a construction permit for plumbing work on existing buildings and exempts only ordinary maintenance, which includes routine repair. Scope decides which side a swap falls on.
A leak at the bottom usually means a failed internal seal and the unit needs replacing. A leak around the top flange means the mount or putty needs reseating, and a leak at the discharge elbow means the gasket is out of place or the bolts are loose.
The knockout plug in the disposal's dishwasher inlet was probably never removed, or the dishwasher hose has no high loop. The hose should rise to the underside of the counter before dropping to the disposal so wastewater cannot siphon back.
That depends on the drain behind the wall, not the town. A disposal sends more solids through the line than a bare drain does, so old rough cast iron or a branch with a sag clogs faster. We camera-check suspect lines when asked.
Not sure which side of the line your project falls on? Call the 24/7 line and a dispatcher will talk it through.
Call (973) 488-5410